

Bathroom Stall Parts & Hardware
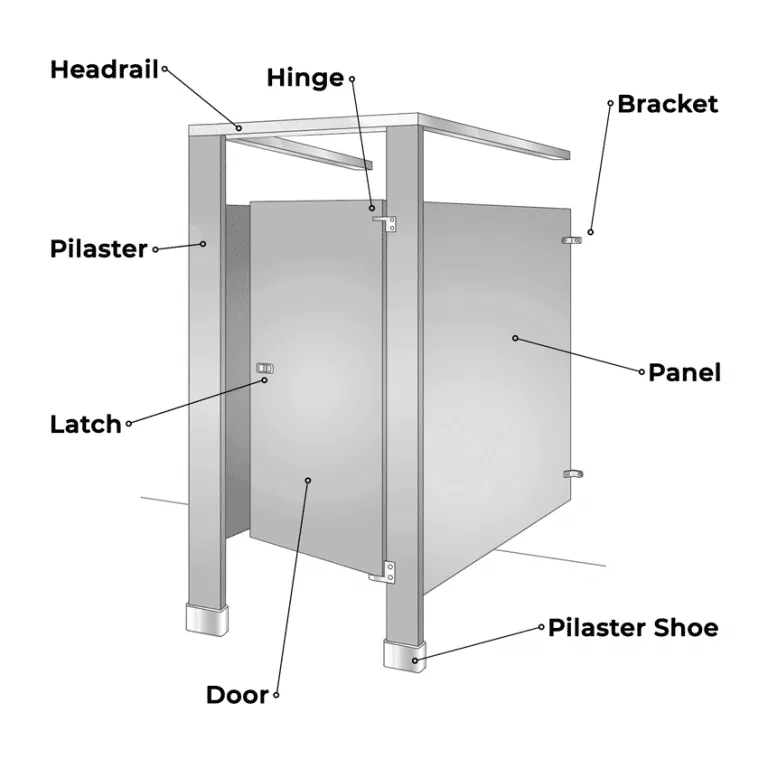
Identify bathroom stall parts with a labeled diagram. Learn what to measure for replacement hinges, latches, brackets, doors, pilasters and headrail.
A bathroom stall is an assembly of doors, divider panels, front supports called pilasters, and the hardware that connects them. Overhead-braced systems also have headrail above the entrance. If you are replacing a broken part, identifying its name is the first step; matching its dimensions and the existing system is what determines whether it fits.
This guide explains the main components and the information to gather before ordering. For a complete new restroom, start with the commercial bathroom stall buying guide. For a repair, use the diagram below to identify the part, check its dimensions, then shop replacement partition hardware.
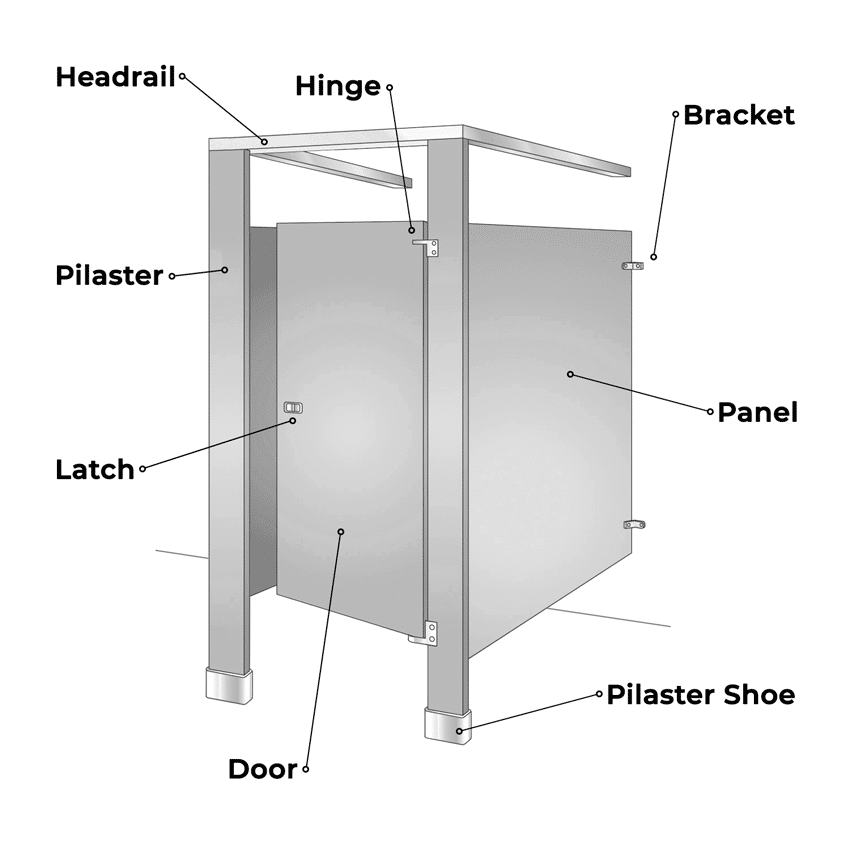
Pilasters, panels and doors: the main partition pieces
Pilasters, also called stiles
Pilasters are the upright supports along the front of a stall. A door may hinge from one pilaster and latch against another; divider panels connect to the front assembly. Manufacturers may call these pieces stiles. Their width, height, thickness and mounting arrangement matter when replacing one. A door width by itself does not tell you the width of the complete stall front.
Divider panels
Panels form the sides between compartments or the exposed end of a row. Record the panel's actual length, height and thickness, plus its connection to the rear wall and front support. Do not assume panels can be spliced to reach a required depth: use the selected manufacturer's supported panel sizes and connection details.
Doors
Doors attach to the front supports with hinges and close against a latch or keeper. For a replacement, record the actual door width, height and thickness, the hardware positions, and whether the door opens into or out of the stall. Photograph the closed door from both sides. Identify handing using the manufacturer's diagram rather than an unexplained “left” or “right.”
The manufactured door width and the clear opening available when that door is open are different measurements. Changing a door or its swing can affect access and required clearances. See the ADA bathroom planning guide before changing an accessible compartment.
Headrail and pilaster shoes
Headrail
Headrail braces the top of an overhead-braced system. Its shape, inside dimensions, attachment fittings and the thickness of the pilasters must match. A similar-looking rail may not fit the existing assembly. Other partition mounting styles support the system differently, so a missing headrail is not automatically a missing part.
Pilaster shoes
A shoe covers the mounting area around a pilaster. The anchor or mounting assembly beneath it performs a different job. Match the shoe to the pilaster's width and thickness and check how it is retained. Replacing a loose cover does not repair a failed anchor or inadequate floor support.
Bathroom partition hardware: what to check for fit
Hinges
A hinge connects the door to its support and controls its movement. Record the manufacturer or any markings, door and pilaster thickness, screw-hole spacing, hinge position, and the existing swing. Check the full hinge assembly, including any separate inserts or pins, against the exact replacement drawing.
Latches and keepers
The latch engages a matching keeper or strike to hold the door closed. Confirm which pieces are included in the replacement package. Check screw-hole spacing, mounting surfaces, door thickness and how the latch meets the keeper with the door closed. A new latch alone may not solve misalignment caused by a sagging door.
Brackets
Brackets connect panels and supports to one another or to the building. Match the bracket opening to the material thickness, then compare the angle, mounting holes and connection type. Wall-to-panel and panel-to-pilaster connections can require different brackets. Fasteners and wall anchors also depend on the substrate and the manufacturer's instructions.
Manufacturer names for these pieces vary. For an example of a complete system drawing, see Bobrick's MetroSeries technical sheet. Its hardware applies to that system; it is not a universal parts list.
What to send when you need help identifying a part
Use our illustrated hardware measuring guide to see hole centers, actual material thickness, bracket openings and latch-to-keeper alignment. Record the measurements below with their units; the illustrations show reference points, not universal replacement sizes.
- A full-stall photo: show the door, front supports and mounting style.
- Close-ups from both sides: include the failed part, its mating part and any brand or model markings.
- Material and thickness: measure the actual door, panel or pilaster where the part attaches.
- Hole spacing: measure center-to-center, and photograph a ruler alongside the part. Include edge distances when shown on the replacement drawing.
- Size and movement: record the part's overall size, door swing and the direction from which you took the photo.
- Quantity and condition: note whether you need one replacement or a complete matching set, and whether the surrounding material is damaged.
Keep the old part until the replacement is confirmed. Do not drill new holes just to make an unverified part fit. Send part photos and measurements to Partition Plus, email our team or call 800-298-9696.
Replacing a part or ordering a complete layout?
For a repair, begin with the existing manufacturer's components and compare the exact drawings. For a new assembly, coordinate doors, panels, pilasters, hardware and mounting as one system. Our partition height guide explains component height versus installed height, and the installation guide links to manufacturer instructions.
To plan new stalls, see how the Instant Quote Tool works, then build your layout and review the resulting package. For a repair that does not match a catalog drawing, send the existing conditions for review before buying.
Match your replacement part
Use the measurements and photos above to compare the actual fitting before ordering.