

Small public restroom
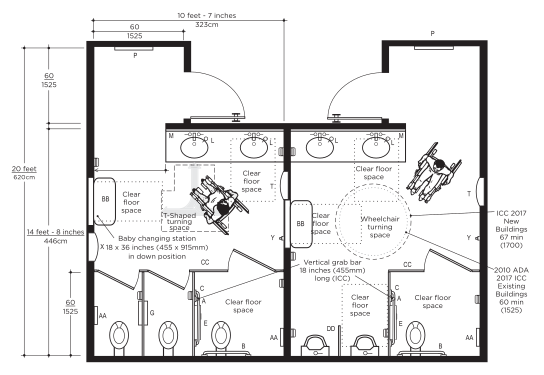
See compartments, lavatories and turning space working together.
 Enlarge drawing
The illustrated planning reference
Find the dimensions. Understand the drawings. Bring a better-informed plan to your next project.
A practical guide to clearances, compartments and fixtures, built around Bobrick’s original illustrations.
 Enlarge drawing
Example layout · figures are not to scale
Before you use a dimension
This reference follows the supplied Bobrick guide. Its ADA and ICC dimensions sometimes differ, especially for new buildings. A minimum, a maximum and a recommended size mean different things.
Keep ADA and ICC references distinct.
New or existing, adult or child, fixture and approach.
Follow the figure notes and review the project locally.
01Floor & turning space
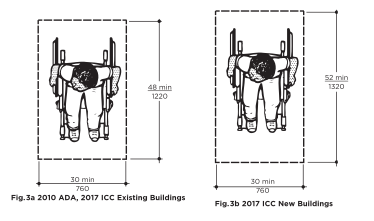
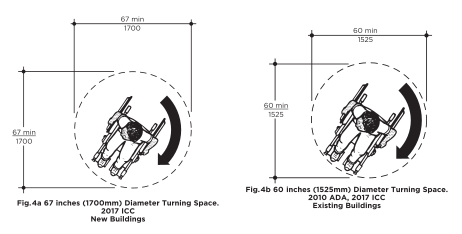
A clear floor space lets someone approach and use a fixture. A turning space lets someone change direction. Plan both, then check how fixtures, doors and accessories affect them.
| Reference | 2010 ADA | 2017 ICC · existing | 2017 ICC · new |
|---|---|---|---|
| Clear floor space, minimum width × length | 30 × 48 in 760 × 1220 mm | 30 × 48 in 760 × 1220 mm | 30 × 52 in 760 × 1320 mm |
| Circular turning space, minimum diameter | 60 in 1525 mm | 60 in 1525 mm | 67 in 1700 mm |
The guide also illustrates T-shaped turning spaces. Their arm, base and overlap conditions matter; use the complete drawings in Figure 5.
Some clear spaces can overlap and some can extend under fixtures with the required knee and toe clearance. The guide’s overlap diagrams explain the conditions.
 Enlarge drawing
 Enlarge drawing
A turning circle by itself does not establish that the entire restroom works. Trace the route from the entrance to each fixture.
02Reach & controls
Measure to the part a person actually operates: the dispenser outlet, lever, button or control. The height of the cabinet alone does not tell you whether the accessory is usable.
| Adult reference | Guide dimension | Condition |
|---|---|---|
| Unobstructed high reach | 48 in maximum 1220 mm | Forward or side reach |
| Unobstructed low reach | 15 in minimum 380 mm | Forward or side reach |
| Operating force | 5 lbf maximum 22.2 N | Controls and operating mechanisms discussed in the guide |
A countertop, lavatory or other obstruction can reduce the allowable high reach. Check the forward- and side-reach diagrams before choosing a mounting height.
The guide provides age-related reach ranges and uses blue labels for children’s dimensions. The adult reference above does not substitute for those tables.
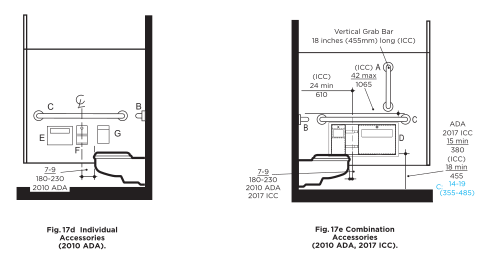
The general 15-inch low reach is not a universal toilet-tissue outlet minimum. The guide gives an 18-inch ICC minimum with a limited two-roll exception. See Figures 17b–17e for the selected configuration.
Place soap and drying facilities where they can be reached from the intended approach, then check the complete route between them.
03Lavatories
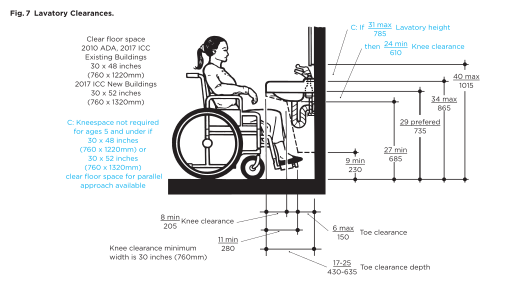
An accessible lavatory needs a usable approach, knee and toe clearance, reachable controls and protected piping. The sink and the space below it work together.
| Adult reference | Guide dimension | Measure or check |
|---|---|---|
| Lavatory rim or counter | 34 in maximum 865 mm | Height above finished floor |
| Knee clearance height | 27 in minimum 685 mm | Use the full knee/toe profile in Figure 7 |
| Knee clearance width | 30 in minimum 760 mm | Clear width below the fixture |
Keep the required clear floor space available in front of the lavatory. Check the applicable new- or existing-building dimension.
Insulate or otherwise configure water-supply and drain pipes to protect against contact. A protective panel must preserve the required clearances.
 Enlarge drawing
Check the complete clearance profile, including depth. A single knee-height measurement is only part of the detail.
04Toilet compartments
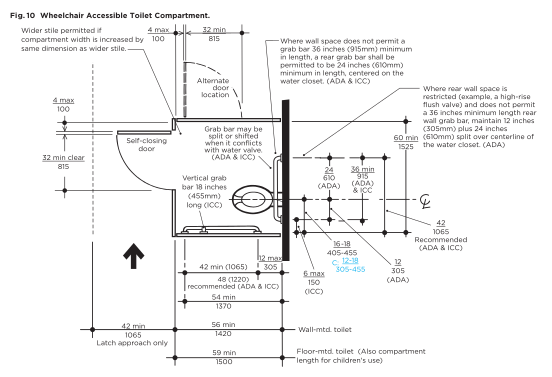
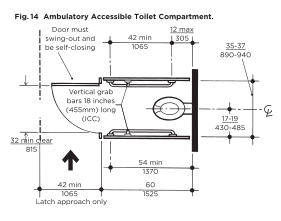
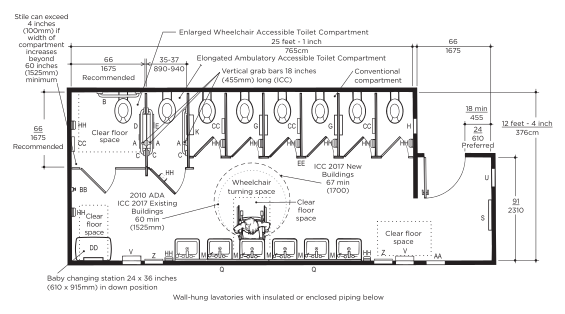
Wheelchair-accessible and ambulatory-accessible compartments serve different needs. The dimensions below describe the guide’s standard arrangements, with the door, toe-clearance and fixture conditions still to be checked.
| Reference | Guide dimension | Applies to |
|---|---|---|
| Wheelchair compartment width | 60 in minimum 1525 mm | Standard wheelchair-accessible compartment |
| Wheelchair compartment depth | 56 in minimum 1420 mm | Wall-hung toilet |
| Wheelchair compartment depth | 59 in minimum 1500 mm | Floor-mounted toilet |
| Adult toilet centerline | 16–18 in 405–455 mm | From the side wall in a wheelchair-accessible compartment |
| Adult toilet seat height | 17–19 in 430–485 mm | Finished floor to top of seat |
| Ambulatory compartment | 35–37 in wide; 60 in minimum deep 890–940 mm; 1525 mm | Separate ambulatory-accessible arrangement |
The guide shows grab bars on both sides and an outward-swinging door. It is not a replacement for the wheelchair-accessible compartment.
Figures 11–12 show other wheelchair-accessible arrangements. The guide says Figure 13’s shorter side-entry arrangement is not offered in the 2010 ADA Standards and requires equivalent-facilitation documentation. Keep each configuration and its conditions together.
 Enlarge drawing
 Enlarge drawing
Compartment dimensions are not whole-restroom dimensions. The approach aisle, entrance, lavatory and turning space need their own room.
05Doors & privacy
Door openings, approach space and partition height can change a layout. Draw the door in its open position and keep required fixture clearances visible on the plan.
| Reference | Guide dimension | Condition |
|---|---|---|
| Clear door opening | 32 in minimum 815 mm | Accessible compartment door open 90° |
| Latch-side approach aisle | 42 in minimum 1065 mm | Outward-swinging compartment door; other approaches differ |
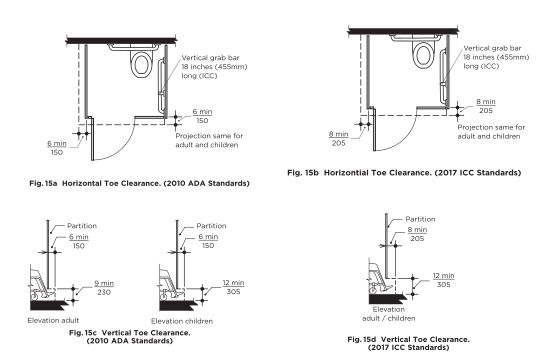
| Horizontal toe clearance · ADA | 6 in minimum 150 mm | Beyond the compartment-side face of the partition |
| Horizontal toe clearance · ICC | 8 in minimum 205 mm | Beyond the compartment-side face of the partition |
Full-height panels and doors may remove the toe clearance available in a standard compartment. Review the larger-compartment alternatives in Figures 15–16 before selecting the partition system.
The guide distinguishes adult and children’s vertical toe clearance under ADA and shows a separate ICC detail. Keep the horizontal and vertical requirements together.
 Enlarge drawing
Full-height compartment wording and dimension labels in the supplied guide need reconciliation. Use the source details for project review; do not treat a condensed full-height size as a universal minimum.
06Grab bars
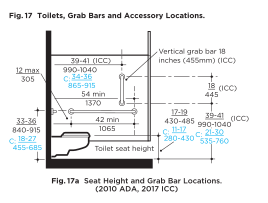
Grab-bar length, distance from the rear wall and height above the finished floor are separate checks. The guide also distinguishes ADA details from ICC additions.
| Adult reference | Guide dimension | Measure or check |
|---|---|---|
| Horizontal grab-bar height | 33–36 in 840–915 mm | Finished floor to top of gripping surface |
| Side-wall grab-bar length | 42 in minimum 1065 mm | The guide recommends a longer 48 in bar |
| Side-wall bar start | 12 in maximum 305 mm | Distance from rear wall |
| Side-wall bar extent | 54 in minimum 1370 mm | Extent from rear wall |
| Rear-wall grab bar | 36 in minimum 915 mm | Placement and exceptions differ; see the source |
| ICC vertical grab bar | 18 in long | See Figure 17a for location |
The guide locates horizontal mounting height at the top of the gripping surface. Its grab-bar length convention measures to the centers of the mounting flanges.
Dispenser and disposal locations must be coordinated with the bars and their clearances. A product fitting on the wall does not establish a usable arrangement.
 Enlarge drawing
Keep minimum lengths and the guide’s recommended longer lengths distinct when writing the specification.
07Accessories & signage
Mirrors, dispensers, waste receptacles, hooks, urinals and signs all affect the finished room. Coordinate them with the user’s approach and the surrounding fixtures.
| Adult mirror reference | Guide dimension | Measure to |
|---|---|---|
| Over a lavatory or countertop | 40 in maximum 1015 mm | Bottom edge of reflecting surface |
| Other mirror locations | 35 in maximum 890 mm | Bottom edge of reflecting surface |
Toilet-tissue dispenser references vary by standard and dispenser configuration. Figures 17b–17e show outlet locations and the relationship to grab bars.
Review protruding objects, operable parts and clear floor space. Recessed accessories can help keep circulation space available.
The guide addresses wall-hung urinal placement in Figure 18 and accessible-restroom identification in Figure 19. Include these in the room review where relevant.
 Enlarge drawing
The appendix’s product letters are examples tied to specific layouts. Confirm the selected product and installation detail for your project.
08Changing stations
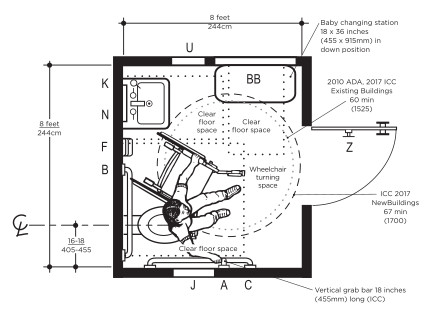
Baby and adult changing facilities need room for the person using the station and anyone assisting them. Include the station’s open position when reviewing nearby fixtures, doors and circulation.
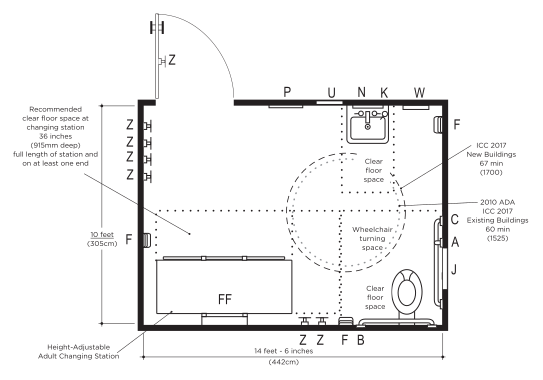
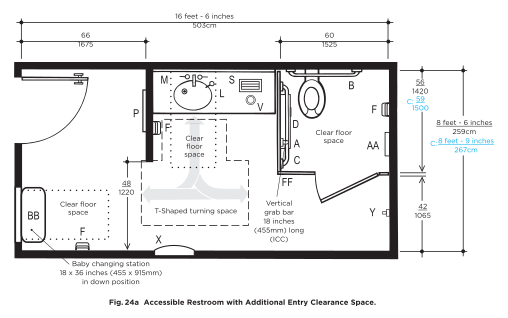
Figure 9 shows approach and knee/toe details. Figure 26 places a baby changing station in an individual toilet room, with the turning spaces illustrated.
Figure 27 shows an adjustable-height adult changing station. The guide includes later ICC supplement material on the station, room amenities and clearances. Review those pages together.
An illustrated room is a planning example. Its overall dimensions are not a universal room-size requirement.
Enlarge drawing
 Enlarge drawing
The supplied edition uses both “proposed” and requirement language for adult-changing clearance. Confirm that detail during project review instead of relying on one isolated dimension.
09Showers & bathing
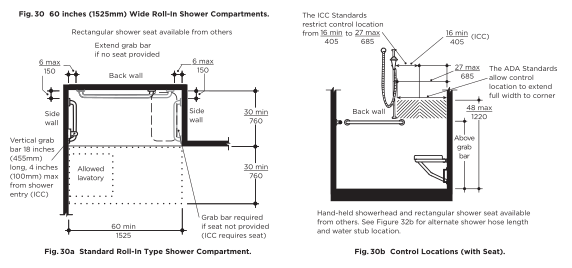
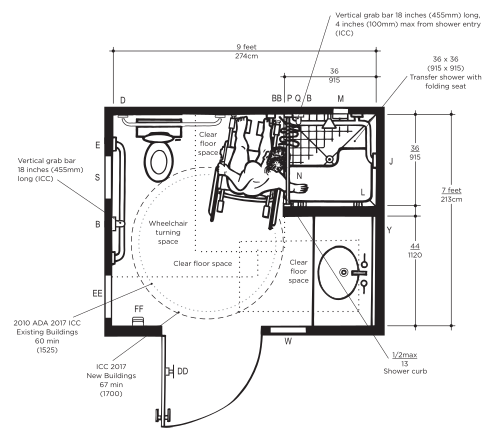
Transfer, standard roll-in and alternate roll-in showers have different arrangements. The seat, controls, grab bars, threshold and approach clearance are part of the same detail.
| Shower reference | Guide dimension | Context |
|---|---|---|
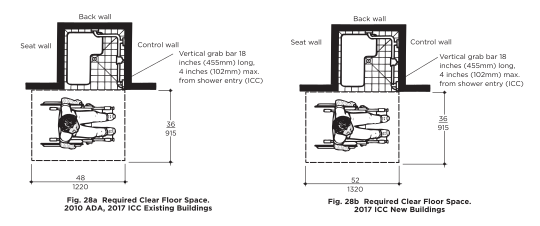
| Transfer compartment interior | 36 × 36 in 915 × 915 mm | Specified interior size, measured at wall centerlines; see Figure 28 |
| Transfer approach · ADA / ICC existing | 36 × 48 in minimum 915 × 1220 mm | Clearance adjacent to the opening |
| Transfer approach · ICC new | 36 × 52 in minimum 915 × 1320 mm | Clearance adjacent to the opening |
| Standard roll-in interior | 30 × 60 in minimum 760 × 1525 mm | Complete arrangement in Figure 30 |
Use the drawing for the selected shower type to place the seat, controls and hand shower. Do not transfer control locations between configurations.
Figures 32–33 cover tubs with removable or permanent seats. Figures 34–42 show complete bathing rooms and multiple shower/dressing arrangements.
 Enlarge drawing
 Enlarge drawing
Review the complete bathing detail, including threshold and adjacent clearance, before selecting the enclosure or accessories.
10Example layouts
Use these original layouts to start a discussion about circulation, fixtures and space. They are examples, not universal room-size requirements. Enlarge a drawing or open its source page for the full product legend.
See compartments, lavatories and turning space working together.
Enlarge drawing
Compare the entrance, approach and compartment door arrangement.
 Enlarge drawing
Follow the clear floor spaces around the toilet, lavatory and station.
Enlarge drawing
Review the adjustable-height station and its place in the room.
Enlarge drawing
Study circulation through an example with multiple compartments.
 Enlarge drawing
Coordinate bathing, toilet, lavatory and turning spaces.
 Enlarge drawing
More bathing and dressing examples: browse source pages 53–61
A few useful answers
The guide distinguishes 2010 ADA and 2017 ICC existing-building references from the larger turning circle shown for 2017 ICC new buildings. Keep the standard and building context attached to the dimension.
Source: p. 11
It is a planning reference based on Bobrick’s guide. The source describes itself as advisory and calls for review against the applicable standards and local jurisdiction. A finished project requires that project-specific review.
Source: p. 3
Take it to your next project
Work through the planning questions below, or take the printable version to a site visit or project meeting.
0 of 12 reviewed · checks stay on this page only
From reference to your room
Send your layout to Partition Plus for help with partition and accessory selection and a project quote.
Code and accessibility approval remain part of your project’s design and local review.
Keep the reference close
Technical content and illustrations are drawn from Bobrick’s Planning Guide for Accessible Restrooms, used with permission. Partition Plus organized the material into this visual reference and planning checklist.
The supplied file contains 60 PDF pages, numbered 2–61 in print. Our page links use the printed page number and open the corresponding PDF page.
The introduction describes a 2022 update using the 2010 ADA Standards and ICC A117.1–2017. Later pages include adult-changing material and a reference to the 2024 Supplement 1. Those edition distinctions remain part of the source; the file’s later metadata date is not treated as a new standards edition.
Figures are not to scale. Read their written dimensions and notes. Some comparison figures have been placed side by side for readability; the original labels are preserved. Open a source page to see the surrounding text and product legends.
The source contains some inconsistent wording and metric labels. We have avoided turning unresolved details into universal dimension rules, including the full-height compartment thresholds and adult-changing clearance. Use the complete source and resolve those details during project review.
Planning guidance, not project certification. The source calls for review against applicable accessibility standards and local requirements. This page does not determine which code your jurisdiction has adopted.